Progress on the skirt
Today I worked a bit more on my skirt. It's coming along nicely.
But before I tell you about the progress, I'd like to answer Gail's question on my previous post. She asked:
Are there no side seams - hence the zip in the back panel?
A: Thanks for your comment, Gail. No, there are no sideseams. The skirt has only 4 vertical seams and those are the ones you see in the front and the back. The fabric goes around the hip in one piece, so to speak. This means that the zipper has to be placed off-centre.
The fact that the zipper is at an 'odd' place means it's gonna attract more attention than when it's put in the centre- or sideseam. That's why I was a bit nervous about the outcome. But there was no need to worry. I can see that now.
This is the backside of the skirt. Apart from the zipper on the left side, it's the same as the front. EXACTLY the same, because the patternpieces for the front are also used for the back. You could wear this skirt with the zipper in the front, it wouldn't have any effect on the fit.

Now I'm gonna focus on the 4 slits. They are of course what this skirt is all about. I'm gonna follow the instruction to put some embellishment around the seam and bought some embroidery yarn, in a colour as close to the colour of the skirt as possible. I want it to be a subtle detail.

So what's next on this skirt's worklist?:
I'm well on my way with this one and I hope I can bring it to the finish. What seemed like a rather simple skirt turns out to be quite a handfull....

Let's just say, he approved of the skirt (.......)
Have a nice weekend y'all!!
Gr.
Lilian
But before I tell you about the progress, I'd like to answer Gail's question on my previous post. She asked:
Are there no side seams - hence the zip in the back panel?
A: Thanks for your comment, Gail. No, there are no sideseams. The skirt has only 4 vertical seams and those are the ones you see in the front and the back. The fabric goes around the hip in one piece, so to speak. This means that the zipper has to be placed off-centre.
Of course I made a few obligatory mistakes and some things just didn't work right away. The zipper for example. I'm practising at the moment to sew an invisible zipper but I've only just started so it's not working perfectly. And untill the day it will be, I'm sticking to what I know: an ordinary, good-old-fashioned zipper. It's always a challenge to make it look right. But after two attempts, it's up to my standards and I'm very pleased with it.
The fact that the zipper is at an 'odd' place means it's gonna attract more attention than when it's put in the centre- or sideseam. That's why I was a bit nervous about the outcome. But there was no need to worry. I can see that now.
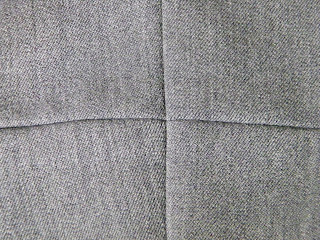
This is the backside of the skirt. Apart from the zipper on the left side, it's the same as the front. EXACTLY the same, because the patternpieces for the front are also used for the back. You could wear this skirt with the zipper in the front, it wouldn't have any effect on the fit.

I'm pretty chuffed with this perfect seam-matching:

Now I'm gonna focus on the 4 slits. They are of course what this skirt is all about. I'm gonna follow the instruction to put some embellishment around the seam and bought some embroidery yarn, in a colour as close to the colour of the skirt as possible. I want it to be a subtle detail.
So what's next on this skirt's worklist?:
- Fold the seamallowance and baste it into place.
- Decide how deep I want the slits to be and reinforce the seams at the top of the slits.
- Baste around the seam and slits.
- Unpick the closed slits
- Sew the seamallowances in place. This has to be done invisible, I don't want any stitches clashing with my embroidery of course.
- Embroider exactly 2,5 or 3 cm (?? haven't decided yet) along the seams and slits, just like it's done on the model
- Prepare the lining. (I want a complete lining for this skirt)
- Sew the lining to the topside of the skirt and fold it inwards.
- Hem the lining all around and handstitch to the seamallowances of the skirt.
- A final pressing....and DONE !
I'm well on my way with this one and I hope I can bring it to the finish. What seemed like a rather simple skirt turns out to be quite a handfull....
Speaking of handfulls:

Let's just say, he approved of the skirt (.......)
Have a nice weekend y'all!!
Gr.
Lilian


It is so often the way that what, at first, seems like a simple quick project turns into a marathon! However, your skirt seems to be coming along very nicely - I'm looking forward to seeing it finished.
ReplyDelete