Blouse finished and a little tutorial on rounded pockets
My first project of 2010 is finished. Considering it's already the 18th of the month, you can't really say that I've been very productive. But that's ok. I'm not gonna pressure myself. Sewing should be fun, not work (for me, that is). And I'm sure speed will pick up once the weather starts to improve.
This blouse is a nice addition to my wardrobe. I'm not over the moon about it, but it's ok.
This is the best picture I can give you. Photographing this fabric is hell. I've tried everything but the details just won't show well:

And these are all the details you can't see in the picture:

This blouse was almost a wadder. I wanted to iron a seam flat. It was quite wavery but I was sure I could fix that. So I ironed on the inside, stretched the fabric a bit and it looked better already. Then, without thinking, I turned the fabric and put my iron on the outer side. Immediately feeling that horrible sense you get when an iron is too hot for the fabric. (I'm sure some of you know what I'm talking about..) I removed the iron at once and saw that there was already damage to the fabric.
If you could have seen what followed I'm sure you would have laughed: I ran away from the ironboard, started jumping up and down (hard!), shouting about 10 times a very ugly word, not to be repeated here.
Then sense took over again (thank God!) and I went back to take a closer look at the damage. I used a wet cloth to brush the fabric in the hope something could be saved. It worked a little, but not enough. Was this the end??? No. Because I saw to my surprise that the collar would cover everything. Wow....I call that being lucky. Here's what's hidden under the collar (only for you guys to know):

It looks a bit like the Nile-delta don't you think? I must say that for once the camera shows more than you can see in normal light. It's not this bad really.
The buttons are really off-centre! But that's part of the design. Here a closer pic of the button-loops (I hadn't yet finished the front-facing in this picture so it looks a bit wobbly at the edge):

Anyone interested in a little tutorial about how to sew rounded pockets??

First mark the seamline with contrasting thread. That's the line going all the way round. Then use a slightly thicker thread to make little stitches in the corners which you're gonna use to shape the rounded edges.

Pin down the seamallowance at the side and the bottom, at the straight parts.
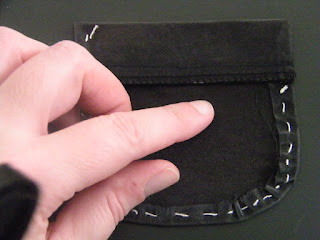
Then pull the thread you stitched at the corners until the fabric is completely ruffled. Then you use the tip of your forefinger to gently ease the corner to the supposed shape by moving it gently back and forth. You reach that point when the stitches with which you marked the seamline lay flat against the corner of the pocket.
At that point start pinning the seamallowance and after that handbaste it so everything stays in place.
After that remove the pins and the thread you used to mark the seamallowance and the thread you used to shape the corners.
Now your pocket is ready to be attached. (In this picture the facing of the pocket is already sewed in place, unlike what you see in the first pocket-picture. And my hand wasn't trying to hide something, it's just that somehow the picture got more contrast when my hand was in it as well).
I hope this tutorial was helpful, but if it raised any questions, feel free to ask them. I'm definitely not an expert but I would like to help wherever I can.
Gr.
Lilian
This blouse is a nice addition to my wardrobe. I'm not over the moon about it, but it's ok.
This is the best picture I can give you. Photographing this fabric is hell. I've tried everything but the details just won't show well:

And these are all the details you can't see in the picture:

This blouse was almost a wadder. I wanted to iron a seam flat. It was quite wavery but I was sure I could fix that. So I ironed on the inside, stretched the fabric a bit and it looked better already. Then, without thinking, I turned the fabric and put my iron on the outer side. Immediately feeling that horrible sense you get when an iron is too hot for the fabric. (I'm sure some of you know what I'm talking about..) I removed the iron at once and saw that there was already damage to the fabric.
If you could have seen what followed I'm sure you would have laughed: I ran away from the ironboard, started jumping up and down (hard!), shouting about 10 times a very ugly word, not to be repeated here.
Then sense took over again (thank God!) and I went back to take a closer look at the damage. I used a wet cloth to brush the fabric in the hope something could be saved. It worked a little, but not enough. Was this the end??? No. Because I saw to my surprise that the collar would cover everything. Wow....I call that being lucky. Here's what's hidden under the collar (only for you guys to know):

It looks a bit like the Nile-delta don't you think? I must say that for once the camera shows more than you can see in normal light. It's not this bad really.
The buttons are really off-centre! But that's part of the design. Here a closer pic of the button-loops (I hadn't yet finished the front-facing in this picture so it looks a bit wobbly at the edge):

* * *
Anyone interested in a little tutorial about how to sew rounded pockets??

First mark the seamline with contrasting thread. That's the line going all the way round. Then use a slightly thicker thread to make little stitches in the corners which you're gonna use to shape the rounded edges.

Pin down the seamallowance at the side and the bottom, at the straight parts.
Then pull the thread you stitched at the corners until the fabric is completely ruffled. Then you use the tip of your forefinger to gently ease the corner to the supposed shape by moving it gently back and forth. You reach that point when the stitches with which you marked the seamline lay flat against the corner of the pocket.
At that point start pinning the seamallowance and after that handbaste it so everything stays in place.

After that remove the pins and the thread you used to mark the seamallowance and the thread you used to shape the corners.
Now your pocket is ready to be attached. (In this picture the facing of the pocket is already sewed in place, unlike what you see in the first pocket-picture. And my hand wasn't trying to hide something, it's just that somehow the picture got more contrast when my hand was in it as well).
I hope this tutorial was helpful, but if it raised any questions, feel free to ask them. I'm definitely not an expert but I would like to help wherever I can.
Gr.
Lilian


Cute blouse! I'm glad you saved it from the iron error. I hate when I do that!!
ReplyDeleteBeautiful blouse - I love the style details of the button loops and cute pockets. Thanks for the tutorial on sewing rounded pockets - it's so important to get these looking right! I think all of us have had an accident with our iron at some time or another - I'm glad yours was recoverable!
ReplyDeleteI like your blouse. I have totally been there with the ironing issues!! I like your description of what your reaction!!!!!!
ReplyDeleteGreat tutorial! thanks. I'm going to file that in my little head for when I need it.
ReplyDelete